Voicemeeter by VB-Audio is a great little piece of software for Windows. For content creators, in particular, I think it’s in your best interest to learn how to use it. There are a few versions of Voicemeeter, each bigger than the last, but I like to use the standard Voicemeeter. It gives you an additional Virtual Input device and a Virtual Output device. My favorite way to use this is to separate my Discord audio to control it independently or remove it altogether from my streams or recordings.
Generally, on your PC, you have all audio routing to the same output channel. When you have OBS capture Desktop Audio, you get all of this mixed together. Game sound, Discord chat, stream alerts, and system notifications as well. Let’s say you wanted to control the gain on just the Discord channel. You might be able to manage but not easily. Now let’s say you want a different volume in your headphones than on your stream. It gets a little more complicated. Or, what if the Discord chat was critical to your content, and you wanted to use it as an audio ducking source to lower the game volume when someone was chatting? Not so easy.
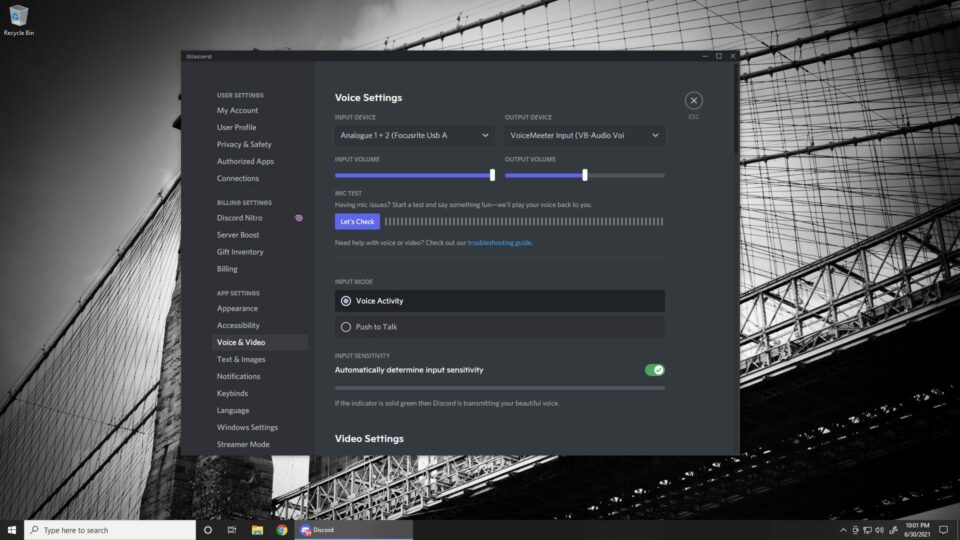
I’ve been able to handle this with Voicemeeter. In your Discord Voice & Video settings, make sure you select your default mic as your Input Device. For me, this is my Focusrite Scarlett Solo. Then select Voicemeeter Input as your Output Device.
Now, in the Voicemeeter interface, first set your Hardware Output Device. Again for me, this is the Scarlett Solo. Then, under the Virtual Input strip, I always make sure A and B are lit up. Doing so means any audio on that channel (your Discord audio) will go out to your Virtual Output and your Hardware Output. If, for example, you don’t want Discord to go to the Virtual Out but route only to your headphones or speakers, you can uncheck B.
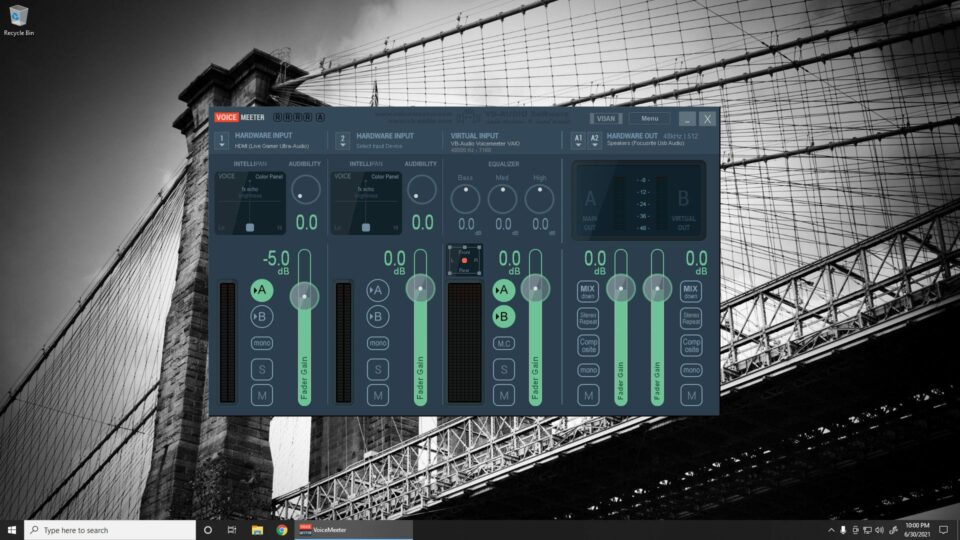
The only issue I’ve run into with Voicemeeter is when my input and output were both using the same Windows audio driver type, and it seemed to overload the bandwidth and mess up all of my audio. Once I switched the input to WDM and output to ASIO everything seemed to work. I don’t know enough about the technicalities to understand what happened there, but something to keep in mind.
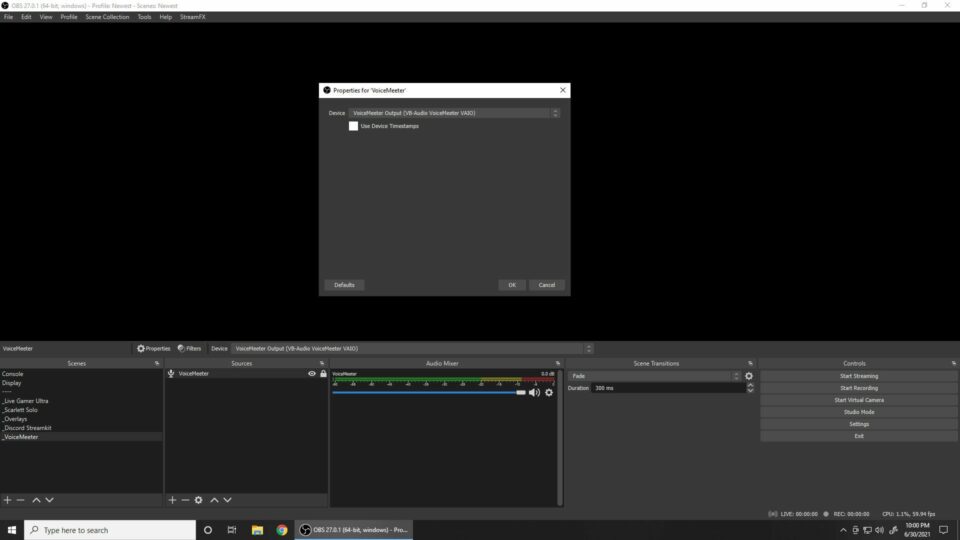
The last step takes place in OBS. You need to add an Audio Capture source and set it to the Voicemeeter Virtual Output. If set up correctly, this input will only contain Discord audio. And you can do whatever you like with it in OBS. Record it only on specific tracks, adjust the gain independently, apply filters, mute it, etc. In Advanced Audio Properties, I have mine set to tracks 1 and 6. Track 1 is just a mix of all my audio that goes to Twitch, and track 6 is just for the isolated Discord audio. So if I record anything, I can manipulate it independently later.
Having more control over little details like this can go a long way in improving your production value. And in my mind, as a hobbyist streamer, you should also strive to be good at the production side, not just the being-on-camera-and-playing-games part. I find it just as fun and enjoyable as the gaming side of streaming.
Distributed under a donation-ware model, Voicemeeter is entirely free to use. But if you find it helpful, you should donate money to the developers to keep the project going. If you’re on macOS, I’ve heard good things about Loopback by Rogue Amoeba too, but it isn’t free. Make sure to check out either software and let me know what cool stuff you do with them.